How to Repair hard-bricked Coolpad note 3/lite.
Things Required:
- Your bricked Device.
- PC/Laptop
- Usb cable
- Little brain 😉
- First see this video tutorial. https://www.youtube.com/watch?v=xPvk-yUQ2mU
Steps:
Step 1: Install Coolpad USB drivers on your computer.
Step 2: Download SP Flash Tool for Windows.
Step 3: Download the Coolpad Note 3 Lite Stock firmware on your computer.
Step 4: Unbrick your device.
Step 5: Repair imei no. (specially for Coolpad note 3 lite users)
Step 1
Drivers:
- Download Coolpad ADB Driver For connecting your device to a computer:https://dl-ssl.google.com/android/repository/latest_usb_driver_windows.zip
- Download CDC Driver For Flashing Firmware:http://www.mediafire.com/file/wr9d19ctlmyqfcr/android_cdc_driver.zip
- Download VCOM Driver For Flashing Firmware:http://www.mediafire.com/file/facdq2tkdiajrs9/android_vcom_driver.zip
How To Install Coolpad ADB Driver In Computer:
1- Download the Coolpad ADB Driver and Unzip the file on your desktop
2- Then open Device Manager
3- Click on Action and Click on add the legacy hardware
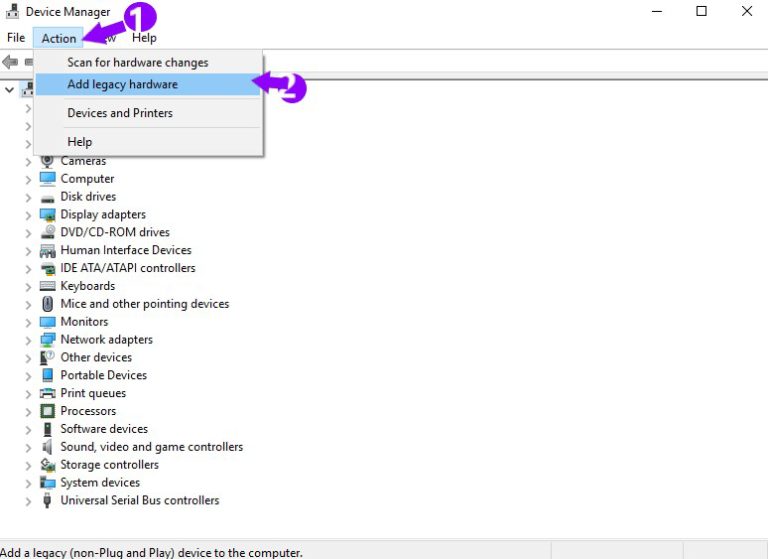
4- click on Next

5- choose to Install the hardware that I manually select from the list (Advanced) and Click on Next

6- choose Show all devices, and click on Next

7- Tap Have disk

8- select the Browse

9- Choose The Coolpad USB drivers file and click open
10- choose android ADB interface and click on Next

11- To start installing your new hardware click Next

12- Click Finish

How To Install Coolpad CDC Driver In Computer
- Download the CDC Driver and Unzip the file on your desktop
- open Device Manager
- Click on add the legacy hardware
- After That Click on next
- choose to Install the hardware that I manually select from the list (Advanced)
- click on next
- choose Show all devices and click on next
- click Next again
- Select Finish
How To Install Coolpad VCOM Driver In Computer
- Download the VCOM Driver and Unzip the file on your desktop
- open Device Manager
- Click on add the legacy hardware
- After That Click on next
- choose to Install the hardware that I manually select from the list (Advanced)
- click on next
- choose Show all devices and click on next
- select usb2ser_Win7 for 32 bit or Choose usb2ser_Win764 for 64 bit
- click Next
- Select Finish
Step 2:
Download SP Flash Tool for Windows. HERE
Step 3:
Unbrick your device.
- Extract Downloaded Zip File Via WinZip and 7zip.
- Install USB Drivers.
- Now Open The SP Flash Tool & Click The Format All+Download Tab Button.
- Now Click Scatter-Loading Button & Browse And Select The MT6735_Android_scatter.txt File From Firmware Folder.
- Now Hit The Download Button.
- Now Press and hold Power button for 10 sec.
- Now immediately press and hold Volume- for 2 -3 sec & Connect Your Phone To The PC.
- After The Flashing A Green Tick Will Be Appear.
- Disconnect Your Phone And Again Connect Your To The PC.
- Install & Open minimal_adb_fastboot_v1.2_setup.exe(Click on this to download)
- On Your PC & Type Or Paste This Command To Verify Your Phone Detected :-
adb devices
adb shell fctest system reboot
- Now phone is switched on.
Step 5:
- Download and install Maui Meta Device. Download from here.
- Beginning the Maui Meta Tool (if it claims some errors concerning log file course, simply ignore that, it is just for the log files!) then in Options be sure that "Connect Mobile phone in Meta Mode" is inspected.
- Go to the settings of you phone.
- Click on about device.
- Tap build number 7-8 times to enable developer mode.
- Now open developer mode and select allow USB debugging.
- Switch off Your phone.
- Connect USB cable with your laptop and also to the phone! (phone should be completely off!)
- Press "Reconnect" button now in the Maui Meta Device.
- After that separate the micro USB cord from the phone and also reconnect it once again, the phone automatically boots up to from itself. Then wait as well as in the Maui Meta Device a pop up must show up.
- In the list/scroll checklist pick "IMEI download".
- Now click on "Change NVRAM data source" data.
- Open Stock ROM folder which you have extracted already for flashing.
- Now search "BPLG" and you will get that file just copy it and paste in your desktop.(this is your nvram database file)
- After then select that file in Maui Meta which you have pasted in your desktop.
- As the NVRAM data need to have been loaded. After that push the "Upload from flash" button in the Maui Meta Tool and it will certainly load the IMEIs of the phone, and show them in the boxes.
- If the phone does not have any type of IMEIs numbers , you could simply paste your original imei no. in the IMEI box, first for SIM1, and after that press "Download to blink" after that do exact same thing once again for SIM2, and also once more "Download to blink".
- Now shut the popup window, and hit in the Maui Meta Tool the "Disconnect" button (essential so the phone leaves Meta method once more!). The phone needs to reboot itself.
- Now simply remove the cable and charge your phone.
- When you start your phone Open dialer and press *#06#
- Viola You recovered your imei no.
I hope you like my hard work and if you find it helpful please share this with your friends.


No comments:
Post a Comment